How To Install A Zagg Invisibleshield: A Step-by-step Guide
Protect your device with a Zagg InvisibleShield! This comprehensive guide provides easy-to-follow instructions for a bubble-free installation, along with tips, troubleshooting, and warranty information.
Table of Contents
Protecting your smartphone, tablet, or smartwatch is crucial in today's world. Scratches, cracks, and smudges can significantly diminish the value and usability of your devices. That's where screen protectors like the Zagg InvisibleShield come in handy.
Zagg's InvisibleShield is a popular choice, known for its durability and scratch resistance. This guide will walk you through the installation process, ensuring a smooth, bubble-free application.

What is Zagg InvisibleShield?
Zagg InvisibleShield is a screen protector designed to safeguard your devices from scratches, impacts, and everyday wear and tear. Available in various materials like glass and film, they offer a clear, touch-sensitive layer of protection. Zagg offers a diverse line of screen protectors for thousands of devices.
What's Included in the Box?
Before you begin, ensure you have everything you need. A typical Zagg InvisibleShield package includes:
- Zagg InvisibleShield screen protector
- EZ Apply tray (in some models)
- Wet wipe
- Microfiber cloth
- Dust removal sticker
- Squeegee
- Installation instructions
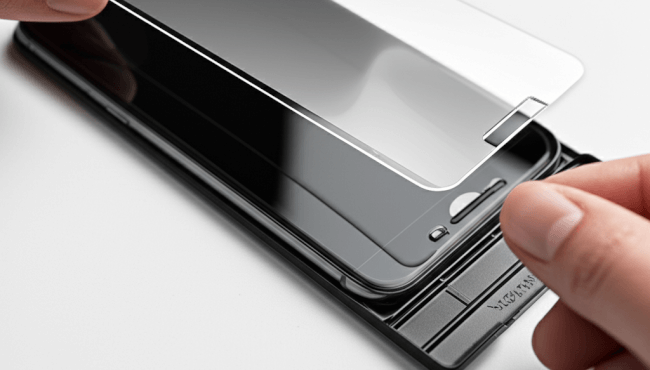
Step-by-Step Installation Guide
Follow these steps for a perfect application:
- Prepare Your Device: Power off your device and remove any existing cases or screen protectors.
- Clean the Screen: Use the included wet wipe to thoroughly clean your device's screen, removing any smudges, oil, or fingerprints.
- Dry the Screen: Use the microfiber cloth to dry the screen completely. Ensure no moisture remains.
- Remove Dust: Use the dust removal sticker to gently lift any remaining dust particles from the screen. This step is crucial for preventing bubbles.
- Position the EZ Apply Tray (If Applicable): If your InvisibleShield came with an EZ Apply tray, place it on a flat surface and insert your device, ensuring it's properly aligned.
- Peel and Align: Carefully peel off the protective backing from the InvisibleShield, exposing the adhesive side. Avoid touching the adhesive. If using an EZ Apply tray, align the screen protector using the tray. If not, carefully align it by hand, paying attention to the speaker, camera, and home button cutouts.
- Apply the Screen Protector: If using an EZ Apply tray, follow the instructions to apply the screen protector. Otherwise, gently place one edge of the InvisibleShield onto the screen and slowly lower it, ensuring proper alignment.
- Remove Bubbles: Use the included squeegee to gently push out any air bubbles. Start from the center and move towards the edges. For stubborn bubbles, lift the edge of the screen protector closest to the bubble and squeegee it out. Small bubbles may disappear within 24-48 hours.
- Final Wipe: Use the microfiber cloth to wipe the screen protector, removing any fingerprints or smudges.
- Cure Time: For best results, allow the InvisibleShield to adhere for at least 24 hours before using your device extensively or putting a case back on.
Tips for a Perfect Installation
- Dust-Free Environment: Install the screen protector in a clean, dust-free environment. A bathroom after a hot shower can help minimize dust
- Patience is Key: Take your time and avoid rushing the process.
- Proper Alignment: Ensure perfect alignment before fully applying the screen protector.
- Night Installation: Consider installing the screen protector at night before bed to allow ample time for adhesion
- Weight it Down: After installation, lay the device face down or place a heavy book on top to help it stick.
Troubleshooting Common Issues
- Bubbles: Small bubbles usually disappear within 24-48 hours. If they persist, it could be due to dust particles. In this case, a replacement is usually required.
- Lifting Edges: Ensure the screen is thoroughly cleaned before application. If edges lift after installation, it may indicate improper cleaning. The InvisibleShield cannot be re-installed.
- Misalignment: If you misaligned the screen protector, carefully peel it off and reapply. However, repeated removal can weaken the adhesive.
Zagg InvisibleShield Warranty
Zagg offers a limited lifetime warranty for its InvisibleShield products. If your screen protector becomes damaged or worn, you can request a replacement.
To make a warranty claim, you typically need to register your product on Zagg's website, provide proof of purchase, and may be required to return the damaged product.
Zagg may replace the product or exchange it with a product of equal value. Some Best Buy locations offer free replacements if the InvisibleShield was purchased there.
Conclusion
Installing a Zagg InvisibleShield is a straightforward process with a little patience and attention to detail. By following these steps and tips, you can ensure your device's screen remains protected from scratches and damage.
Don't forget to register your product to take advantage of Zagg's limited lifetime warranty for added peace of mind! With proper installation and care, your InvisibleShield will keep your device looking its best for years to come.
Related Posts
Zagg InvisibleShield Warranty Tutorial
This is the entire process of getting a replacement screen protector from Zagg. If you’ve registered the product, you’re given a certain amount of time frame.
Register Your ZAGG Product: A Step-by-Step Guide
Learn how to quickly register your ZAGG screen protector, case, or other accessory to activate your warranty and ensure you're eligible for replacements. Don't miss out on ZAGG's warranty benefits!
How To Apply A Screen Protector Zagg For iPhone | Register Zagg Online
After you receive your replacement in the mail, you do need to send them back your old, damaged screen protector. They will send you an envelope to put it in and mail it out.
Notice: Internet users spontaneously contributed the article content, and the article views only represent the author himself. This site only provides storage services, does not have ownership, and bears relevant legal liabilities. If you find plagiarism, infringement, or illegal content, please contact the administrator to delete it.